home about me our home

Wednesday, June 29, 2016

Adding Some Special Touches To Our New Backyard

   
When you purchase a brand new home it takes a bit of time to put your own personal stamp, and make your own.

We have been in our home 8 months and we are feeling more and more like it is ours.

I have to admit I keep waiting for someone to tell me it is time to leave.

You know that feeling of having to leave the place you have been staying on vacation, and it is time to go home. That is how I feel here.

Recently our yard was finished, and we have been bringing some of our personal touches that we had in our last home's yard. 

With each piece that we add we get more of a feeling that we do get to stay here and this is our home.

Let me share some of the additions to our yard that we have added. 

I used restraint because this yard is different than our last yard, and certain things work, and certain things do not work as well here.

I love decorating inside and outside of our home with letters. We use the letter, "P," since that is the letter in our last name. 

One thing I had to be careful of in this yard it to not add too much. The yard spoke for itself, and truly did not need too many extra touches.

We added the letter P in the form of monogrammed pillows....

Since the color scheme in our yard is cobalt, black and white this pillow from Ballard designs works perfectly and they hold up really well.

Years ago I was antiquing on a road trip and I found 4 vintage wrought iron gates and grilles. I had them behind vines in our other yard and they made a very nice back drop. 

This is the smaller and more ornate one. Notice to the left you will see a little statue. We call him little Jimmy and he is picking up a rock from the garden. He had to go in our yard here. He use to be leaning over the little bubbler in our last yard...


We used two of the larger gates on our side yard to hold up the jasmine on the fence. It is so nice having these old friends here with us.

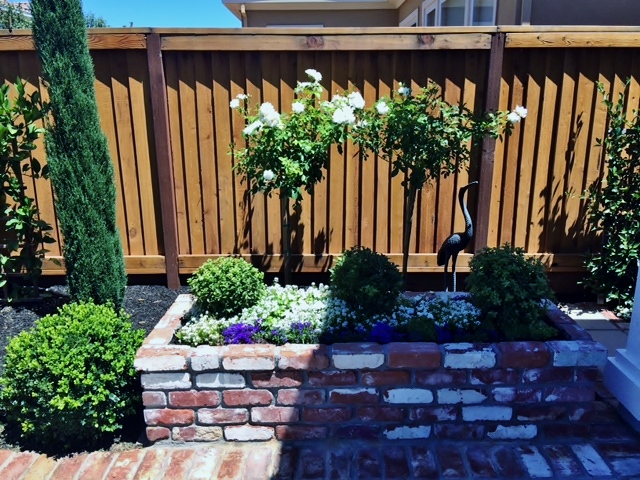
The other metal piece is a crane. I have always loved these birds in yards, and since he was in our last yard I had to find a place here for him. 

I had so much fun trying this place and that place, until I found the perfect little area......

Here he is peeking out behind the rose bushes.

I think he feels right at home!!

I have another letter "P" to show you. This was a gift from some very dear friends that live out of state that were staying with me. 

We went to the Alameda Antique flea market and they surprised me with this. They know how much I love to add a touch of whimsy to my somewhat more classic design aesthetic.

It is a vintage neon letter, "P!" and it is black and white!! It could not be more perfect for our home.

Here it is during the day, but when it really shows its style is at night time. 

I tried to get some good pictures at night, but you all know how hard that can be.....

and

To say we love it is an understatement.


Last but not least we added the mirror that use to hang on our front porch....

( our previous home's front porch)

I love the reflection of our side fountain and plants in the mirror.

We were both surprised at how much the addition of this mirror completed the look, and feel of our yard to both of us. 

I would never have expected this one piece to make us both feel that way, but it did.


Of course I still have a few more plans down the pike, but they can wait, I am in no hurry and we have the rest of our lives to do more things.

IMPORTANT LESSON:
When adding elements to an indoor or outdoor space, step back and look at the area as a whole unit, not just the area you are trying to add something. Make sure that what you are going to add does not make your eyes jolt from one piece to another. There should be a gentle flow, and continuity to the entire picture. There should be what I call a visual flow. Not every nook and cranny has to have something special to look at, the eye needs a place to rest, even in your yards.


(even our lawnmower matches our yard, how did that happen? I guess I have trained him well.)

I will share more with you in the future, but for right now we enjoy our morning coffee out back and in the evenings when it gets dark we enjoy the quiet, peace that we have in our backyard.

WE both can say 
life is pretty darn good!!


Saturday, June 25, 2016

Great Ideas For Your Weekend


/:


It is that time of the week again. The WEEKEND!!! Woo- Hoo!!

Are you ready for some mind boggling ideas to shake up your weekend?

Here we go……….


cupcakes in dollar store champagne flutes.  seriously, why didn't I think of this?!:

I just had to start with this sweet idea!! These plastic flutes from the dollar store are great presentation holders for cupcakes.

Depending on your color scheme for your party you can customize these for your own personal need.


If you are serving punch at the same party don’t go for normal ice try these over sized flower shapes made out of………
Make ice in the bottom of plastic bottles for flower-shaped ice to float in punch bowls!  Will remember this.:

The bottom one is a liter soda bottle bottom! Genius!! Love this idea!!

Now for some special decorations take an ordinary balloon and do something a little special by……..

to get balloons to hang upside down put a marble inside before blowing up.I love white balloons in different finishes, shiny,pearl,matte.:

…… putting a marble in them before blowing up and they will hang upside down. 

I love white balloons in all different finishes. One other special touch if your party is at night, add a glow stick!!!!


Speaking of lights!

Hang a lantern filled with a strand of battery operated twinkle lights...looks like fire flies!:


Fill any inexpensive lantern with a string of white lights and hang around your yard or in a tree. Can you imagine these en masse’, amazing!!!


Now let’s get down to some practical ideas……….


put cotton ball in fingers to protect them from getting cut by your nails,great idea!:

Are you like me and you poke holes in your rubber gloves? 

Well, cotton balls to the rescue!!!! Just poke a cotton ball down in the tip of the finger and they will be protected from sharp fingernails!! So simple!!

My reader NanaDiana just wrote a comment and she puts some baby oil on her cotton ball in her garden gloves and she gets an oil treatment for her cuticles. Brilliant Diana!!


for painting on ceilings or other high places to prevents drips.:


Don’t you just hate paint splatters on your face when you are painting something above your head? Make a paint guard with a plastic bowl lid!!! Now, why didn’t I think of that?


Another pinner said:  I wish I had seen this years ago!! Tape before caulking. Smooth out with finger. Then peel off the tape immediately, before it dries. SO smart!!:

My hubby is really a very handy guy, but there is one thing he is not very good at…. Caulking!! 

You know the saying, if a little will do good a LOT will do better?!! Well, that is his method when caulking, and you all know that does not work.

This looks like the perfect remedy, tape using two pieces of tape, and caulk your line between the two pieces of tape. Voila! Not too much, and a perfectly straight line!!!


This next idea actually comes from ME!!!! I did this in our kitchen re-do. We had the typical 1978 cabinets. I decided to paint them but before I did the painting we adding some skirt molding and feet to the bottom of the cabinets.

Guess what I used for the feet? Shelf Brackets, turned upside down. Inexpensive shelf brackets!!!!


Use shelf brackets ($2.00ea.) turned upside down to give the bottom of kitchen cupboards the look of furniture legs. 1970's kitchen transformed.  http://goodlifeofdesign.blogspot.com/2010/03/how-many-looks-can-kitchen-have.html#:


Each bracket cost $2.00!! I think that was money well spent, don't you? If you would like to see more of my kitchen you can go to the top of my blog and take a tour of my home!!


BEFORE YOU BUILD A HOUSE - A forum of handy ideas people wish they'd thought of before they built:

For those of you that have a pony wall in your home, or plan on having a pony wall, how about some extra storage? Brilliant!!

Have you ever wondered if some of the ideas you see on Pinterest will work or not? Well, some brilliant person is writing a blog specifically dedicated to those ideas that Did NOT work called PINSTROSITY!!

Pinstrosity -- A blog where people submit Pinterest projects that didn't turn out as planned. I love how they tell you why it didn't work and what you need to fix.:
Ways for Kids To Earn Money Around the House.  I especially love that these cards have step-by-step directions for the kids!:


When your kiddos would like to earn some extra money by doing chores around the house give them this envelope with chore cards that have instructions on how to do the chore, so they know what you expect, and the amount of $$ it is worth. Brilliant idea!!

That is it for this weeks installment of Great Ideas!! 

Have a wonderful weekend!!!


Thursday, June 23, 2016

An Easy Method To Summerize Any Room


I  had a comment on my blog from one of my readers from Australia………
BloggerShe said... 

I'm always fascinated to read that you northern hemisphere dwellers change your rooms for the seasons and swap colours and accessories. We don't do that here in Australia, what you have just stays until you don't like it anymore and change it.

But we don't do cool colours for summer and warm colours for winter. I don't really like reds and other warm colours so I think I would be stuck. I just stick with what I love all year round.


via

I found her comment interesting and it made me think....
....... I have always changed for the seasons. Nothing life changing just a few elements here and there. 

It just comes naturally to me, but after reading this comment I realized that maybe this would make a good  How-To blog post.


Where do you start!
A LIST OF ELEMENTS THAT MAKE YOU THINK OF SUMMER!
This will vary quite a bit from person to person and even from area to area.
When making your list try to think of varying textures, and favorite summer colors that you can incorporate easily into your existing space.
MY LIST:
  • Cool blues and greens
  • Sea shells or found objects from the beach
  • Clear vases or vases with blue or green tints.
  • Beach stripes
  • Baskets for texture
  • Fresh Ferns
  • Images of beach scenes
  • Sailboats
  • Lemons(reminds me of fresh cool lemonade)
  • Limes
NEXT……
Once your list is made you can begin the fun part!!
Clear your room of allllll the accessories  and elements you want to change out! Yes! ALL of them!

 
Now you have a clean slate to add your summer additions.
It will be up to you which elements you change out.
ELEMENTS THAT I LIKE CHANGE OUT:
  • Accessories
  • Pillows
  • Rugs
  • Artwork
  • LAMPS
  • BOOKS/MAGAZINES
I begin adding my summer additions with the larger pieces first. Lamps, artwork, larger accessories, and pillows.


Next I will fill in with the smaller pieces. With each item that I add I step back, and look to see how it changes the look, and feel of the room.

When adding each element look at the area you are going to place it, and decide if you need a shiny, smooth or rough texture in the area.


Also, do you need a pop of color or just a place for the eye to rest?! Remember not every single nook and cranny has to have something added to it in a room.

Remember to always step back and view the room as a whole after each new addition. You want your room to visually flow.

Now you are ready to enjoy your new
summer look!!!