home about me our home

Thursday, April 28, 2016

My Favorite Makeup products


Don't you just love being a girl? When you think about it we get to do and have so many fun things. 

Like Make-up for instance! 

I will have to admit I am a make-up product junky, especially when it comes to lipsticks and glosses.

Today I am going to tell you the products that have been tried and true for me and the products I have repeatedly purchased, or will purchase again.

Let's start at the bottom of all this!

 The base or primer.

I absolutely love this product and it last forever! Well, at least almost forever.

What I am saying the price is more than worth it for the beautiful finish it gives you and for how long it last.

If you are a woman of a certain age and feel as if you have lost that glowy, dewy look your skin use to have, this will be your new best friend. 

You only need a little tiny bit. I use less than a pea size and dab it on my face to disperse it and then blend it in. I like to use this brush for my primer and for my foundation....

Real Techniques Expert Face Brush found HERE!

Now for the primer....


You all can thank me later!! Seriously!

This foundation is new to me as of this year. We had an event here at the club where I live for Dior, and I fell in love with this foundation. 
Now don't get nervous about it being a spray. I know I was at first, but you spray it on your brush and you can build upon it if you want more coverage, it builds beautifully. 
I use two quick sprays on my brush, dab it around my face and then blend in. It is a beautiful finish that seems to last almost all day long. Because you use so little it will last for a very long time which helps warrant the price point.


Now that we have a nice base lets talk about color for our faces.

BLUSH!

I was first introduced to this liquid blush while watching a Lisa Eldrige video. I usually watch her makeup videos on Saturday mornings with my coffee.

In this particular video she was doing Edith from Downton Abbey, who happens to have glowing, beautiful skin. You can watch it here if you are interested. I highly recommend Lisa Eldrige videos, she has amazing techniques and she explains things so well and at the end of the video she has a list of products used in the video.


This liquid blush is truly like a water color paint, it is very runny and that is the only down fall if you could call it that. It gives a beautiful transparent glow to the skin and it is also buildable for more of less blush depending on your desired look.

What I love about this is the glow and the way it lays on the skin, it is somewhat of a stain, so you need to wash your fingers after you blend this in. I dab it on first and then blend with my fingers, you need just a drop and you are good. This too will last for a very long time. 


For a nice finish to my blush I use Bobbie Browns Rose Brick.  I keep this in my purse for touch ups.I have used this for literally years and it is my GO-TO blush, it is very transparent and gives a nice glow a well. Can you tell I love a dewy finish?


Now that you have a flawless, glowing, blushing face it is time to address the eye brows, eyes and lips.

As we age our eyebrows seem to disappear, it's a mystery!!!

I found two products that seem to help me out so I have to share them with you. Both products are by Anastasia. The pencil is Taupe


Let me tell why I am sold on this product. I have a spot on my right eyebrow that will not take color. It is the strangest thing. I have tried several different products and this is the one pencil that will fill in that spot. 

This next product is a tinted gel and I got the ash blonde because I wanted to soften the look of my brows and this does the trick. 

First you brush the brows away from the direction that they grow, this helps coat the hairs. Then you brush them straight up and then you brush them in the direction you want them to go. They look soft and the gel holds them in place.


Remember the eyebrows frame your eyes. Make sure you don't make them too skimpy, or too short. I see women all the time make their eyebrows too short or skimpy and I just want to help them fill them in. Here is a little diagram that will help you know where to start your brow and where to arch it and end it......


 Use your eye as your guide. I like to use the side of my pencil placing it pretty much at the angles you see in the diagram to find the starting and ending points.

 If you are like me you are looking for the perfect mascara. 

I have tried so many, I can't even count how many I have tried. My lashes have changed in the last couple of years so my needs have changed. I have a horrible time with clumps with most mascara. I recently found a new one for me, that so far, I am really pleased with, so I had to share it with you.


Benefit's They're Real


 My tried and true eye lid color is pink. I have green eyes and the pink brings out the color of my eyes. I first start out with a primer by NYX, it is inexpensive and it makes my eyes look brighter and more alive. I was amazed at how many makeup artist use this product. That is why I purchased it the first time.


If you would like an eye shadow palette that will work for just about anyone try these two out..

Natural....

This is the one I use, Adorable.........

As far as eyeliner goes, I have used this particular one for more years than I can count. I have used it on just about every type of coloring that there is and it works for everyone. It is Hyacinth sky buy Estee Lauder.  I would call it a charcoal navy with a purple base.

I am not an expert, but I will admit that I have done makeup for weddings and proms in the past so I do have a bit of experience, and I love makeup and read about products all of the time. I want to share with you what I have found to work for me and for others as well.

I will leave you with some good advice I read on finding the perfect lipstick color for you. look at the inside color of your lip and find a color as close to that as you can. If you do that you will have a color that will always work for you.
I will do another post on my favorite lipsticks and lip glosses.

This was a fun post for me to write, I hope it was fun for you to read and maybe you will find some new products that you will enjoy as much as I have enjoyed these.


Tuesday, April 26, 2016

The Main Players In Our Backyard Plans


  Picking Out the Base Plants!

Yesterday was such a fun day for us. We got to go to the wholesale nursery with our landscaper and chose all of our plants.

Since I am use to being the one doing all the design and guiding my client it was a bit hard for me to let someone else do that for me. Going through this process I really did have to deal with my control issues. YES, I am admitting it, I have control issues!

Luckily my landscaper hit the nail on the head right out of the gate. During our first meeting after seeing the front of our home and coming into our home he already had a very good idea of the direction he thought would look good with our style of home and what he saw inside our home.

When we first started this process I had copious amounts of images for inspiration on my pinboard. You can see them here.

Jorge envisioned a more semi-formal yard with square planter boxes filled with boxwood and white iceberg roses. I on the other hand wanted curved lines and lush green plantings that varied in textures and colors in order to give our yard a cool and relaxing vibe.

Now that we have come full circle we are actually having a bit of both. To be honest I had never considered the iceberg roses, and yet we are surrounded with them in our community and right now they are blooming their little heads off.

We live in an area that is surrounded with grape vines, olive trees, Italian cypress and white iceberg roses.

Most of the homes here have a very California/tuscan vibe so these type of planting are perfect. We, however, have a home with siding, not stucco and it has a definite cottage feel to it.

Keeping all of this in mind, Gorge came up with a design plan, after talking to us at great lengths that we were delighted with. He gave us our curves and circles and also added a touch of what I will call a semi-formal look to our yard.

I am going to show you the over all plan, but keep in mind that the plantings will be tweaked as we lay them out in the actual yard.

Right now it is a bunch of circles and symbols, but trust me everything is covered in this plan. The plants, lights, irrigation system, it is all there.

Right now we are at the point that all the hardscape is almost all done. Here is a picture that my neighbor took for me from the back of her fence looking into our yard, so you can see where we are at in the process.

I think seeing this with the plan will give you all a better idea to the overall look. 

As you can see we chose to use reclaimed brick.(reclaimed brick from Stanford University) The reason I chose this look is I felt it goes along perfectly with our cottage style home. 

Most of the homes around here have pavers, or stamped concrete which to be honest goes perfectly with the style of the majority of homes here, but for this gal I wanted something that fit our cottage style.

Once I started seeing the brick work coming to completion I realized that Jorge was spot on with his first vision of planting and feel for the yard. It definitely has a more formal look to it.

In fact it reminds me of the courtyard gardens in Charleston. I can only dream that my yard would ever look as lush as the yards in Charleston, but it is definitely a look I would like to emulate.

So with our vision intact we went shopping for plants. If you look at the plan up above you will see two larger circles very faintly, these large circles represent trees.

This is where I was having the hardest time visualizing. I told Jorge that I felt I needed to choose the trees and the other taller elements first in order to choose the plants that would fill in. Luckily that is exactly how he works too.

I did so much research on trees and I had to keep in mind we also had restrictions from our HOA, and there is the whole water issue here in California.

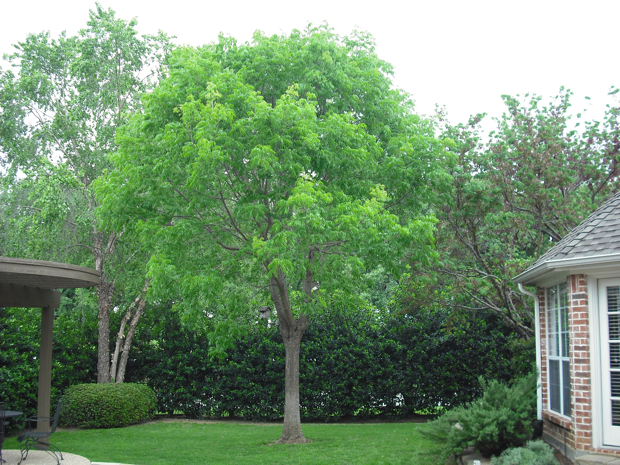
I was feeling very uncertain about the tree selection. I started looking around our area for inspiration but was coming up with nothing. UNTIL, one day while at Home Depot in their parking lot I saw a tree that I really loved.

Loving the trees was important to me. I saw it again at my Grandson's baseball game. 

I had no idea what type of tree it was, but luckily Jorge knew exactly what it was. He agreed it would tie in nicely with the overall plan and was a suitable tree for what we wanted, and what the HOA would approve of.

I wanted a tree that had an umbrella like canopy for shade, a single trunk and that would have leaves that would move in the wind. 

At first I wanted an evergreen, but did not find anything I loved that was allowed. So this tree is deciduous and has glorious color in the fall months from what I have read.


We chose a Chinese Pistachio tree. You can read all about it here.  

We had already discussed which size to buy and we are getting a 36in boxed tree. The reason we are going for larger to start with is to be honest, we are 66 years old and we want to enjoy a larger tree sooner, than later. 

We are planting these for our enjoyment, not the next generation! Jorge being younger had to grin when we told him our reasoning.

Behind the two trees up against the fence we will be planting 5 bower vines. They stay green all year and have repeat bloomings throughout the year.

We chose the white with the pink center since we will be adding touches of pink in our color scheme of plants.


We also decided to us a lot of boxwood in our base plan. You can see it in the plans above next to the mow strip surrounding the yard. 

We chose to use Green gem for its deeper color of green than some of the other boxwood plants, and it also grows in a nice global shape naturally.


The next trees to be chosen were the trees along the side fence line. You can see them in the design above represented by 3 smaller circles. These will be in 24 in boxes.

After going over our design and the overall feel of the design we chose something that was more architectural than for a privacy screen.

This is a plant that I was not familiar with. As I said previously Italian cypress trees are seen all around our area. We had experience with these large trees before and to be honest we did not like them. They get huge and appear messy over time. Not the look we are going for.

However Jorge introduced us to the Tiny Tower Italian cypress. It will grow about half the size of the traditional Italian Cypress trees and has a very tight compact, neat growth. They are perfect for the look of our yard so we will have three on each side of our yard.

There will be two open spots between the three Tiny Towers and we are going to plant two citrus espaliered trees. One lime and one lemon on each side of the yard. 

I was so excited with this idea and it will not only be pretty but I will be able to use the lemons and limes.


We are very fortunate to have the climate that citrus will do beautifully in.

Now that the main base plants have been chosen it was so fun to choose the other plants that will fill in.  I will be showing you those in my next post!!

Planning a yard is very much like planning a room. It is wise to choose the main furniture pieces and then fill in with smaller pieces and then accessories. In this case it is larger surrounding plants, then medium plantings, low growing and ground covers.

Thank you to all of you that have expressed your excitement for us. It is still amazing to us both that we get to do this at this time in our lives. 

Living with gratitude and.......

"Enjoying the Process!"


Thursday, April 21, 2016

NEW HOUSE UPDATE!


 BACKYARD PROGRESS
Brick, Brick & More
BRICK!!!

Last I left you we had the patio poured and the forms all done.


They have done so much work and we are well on our way!! The plan is to use used brick around the lawn on the mow strip and the entire circular patio will be used brick in a herringbone pattern.

You can see the brick is in position and they will perfect the over all patterns before they ever permanently mortar them down. With each step we are asked if we like it or want to change anything. Our contractor is amazing, he is a man of solutions not a man of excuses or problems.  So far his workers have been amazing.

So far we have had to use 3 pallets of used brick and we have another 1/2 pallet coming today to finish it all off. I originally told our contractor that new used brick would be fine because I knew real used brick is hard to come by.

Well, to my delight we got the real deal! This is used brick that was taken from Stanford University.

The image in the right corner is the pile of bricks from Stanford. They have so much character and patina. There are some that have white paint, green paint and even burgundy paint which is Stanford's school colors. Just an extra added feature for our new yard that excites me.

( this little pocket garden on the side will have a fountain, you will see it at the end of this post)
Our walkway and extension of our side covered patio area.

Our brick mason hard at work, we are half way there!! Loving every single brick as it goes down. 
(images taken through screened window)

2/3's the way there. It is really coming to life now!

Waiting for more brick to do final finessing before completing the grouting process. You will notice cinder block on the back side of the circular patio, that is going to be a brick bench seat.

It is all so interesting to watch the whole process and with each element that is added I can see the vision of my completed yard.

I CAN HARDLY WAIT!!....

....We get to go Monday to pick out all the plants, boulders, and gravel that will be the finishing touches. 

I have been waiting for this day to come. I love choosing plant material and I have a real love of rocks! ( I am strange like that, yes I am!)

Yesterday we ordered one of the two fountains we plan for the yard. This little beauty will be going in the pocket garden off of our side covered patio. Hopefully it will be backed with an espalier vine and ferns surrounding the base.


I sure am , 
"Enjoying The Process!"


Monday, April 18, 2016

A Fashion Post


 HAVING FUN WITH YOUR WARDROBE IS KEY!!

Color and pattern are big this Spring. I love it! 

However I am not a big floral lover when it comes to wearing it on my body. 

Give me a colorful bouquet of real flowers and I am delighted, but when choosing patterns for my home, and my wardrobe I am more of a stripe or check kind of gal.

So what is a girl to do? Well lets look at other places we can wear color and pattern. How about your FEET?

Earlier this season I saw a darling pairs of sandals that were very colorful and I have not been able to get them out of my mind.


Look at how many colors are in these shoes, you could wear these with so many outfits! I fell in love with them. They have yet to enter my closet, but they are definitely on my radar.

When I saw these it made me look around for more colorful options....


These are just so fun, notice how the wedge is not just high in the back but also in the front, this will keep your foot a much more level angle and be more comfortable but will give you some height if you are a bit short like my self. These could be worn with dresses or pants, easily.


This next pair is a flip flop but it could be worn with a cute sundress or shorts easily.


I think these are so fresh and Summery or Springy!!

If I am being honest with myself this pair actually would have the most possibilities with my own personal wardrobe. They are also more geometric in their design and that is what I tend to enjoy wearing the most.



Sam Edelman brand shoe usually will fit my thin foot so that is also a plus. Oh dear what is a girl to do?

This is just another way for you to wear pattern in your wardrobe if you are a little shy using it in a piece of clothing. Just think of the fun nail polishes you could add to the mix!


THINGS TO ALWAYS REMEMBER!......
We all need to have more fun with our wardrobes and adding color and pattern is a way to amp up your wardrobe without having to make a bigger than life statement. 

Remember one of the key things you need to do when dressing is always wear colors that you look, and feel good in, and the other thing is to have some fun with your wardrobe!!

BTW: For those of you who might not be aware of how to find the shoes pictured, just click on the word VIA below each picture and that will take you to the link!!