home about me our home

Friday, September 11, 2015

I Have Something For You To Read!


Happy Friday !
Are you ready to do a little blog hopping?

Today I am over at Design Chic doing a guest post!

Can you guess what it might be about?

Be sure to go and find out and let them know Kathysue sent you!!

Kristy

While you are there take a look around on their blog, I promise you will be so inspired by the beautiful images and information presented. They also have a shop of elegant and classic pieces.

kristy1
beth kristy photo
Kristy and her Mom, Beth are co-authors of their blog, and they are true Southern ladies, warm, welcoming and elegant in their style and design.


kristy 3

One last thing Kristy wrote a book  too! Yes, she is beautiful, has impeccable taste, is a designer, and an author…..

kristy2
You can purchase it HERE!

Now go over there, and see what I wrote about!!

Color, Color, Color


Saturday, September 5, 2015

10 Steps To A Budget Friendly Fall Mantel


Fall mantel2
Do you want to make changes in your home for the Fall season, but have a hard time knowing where to start?

This post is just for you!
 
Fall mantel(A BIT OVERBOARD IMHO)

I see so many mantels that are a bit over board in their decor ,and they would not fit into everyone’s home. 

Some home decorators like a more is more look as in the above image.

It is easier to do a more simple version so I started looking for a mantel that was simple, balanced and well designed.

Plus, I wanted it to be a mantel that any homeowner could personalize to their own design aesthetics on a budget.


fall fireplace

In the above image you will see that the mantel   meets all of my criteria, simple, well designed, balanced, and I believe that the overall composition can be personalized to fit in most homes.

I also believe that most home decorators could duplicate this mantel if given the resources, and some guidance.

Not everyone is as clever as the designer, Melissa Michaels,  to come up with this composition on their own.

After getting permission from Melissa I decided to do a step-by-step of how to create this mantel. 


FIRST STEP:
Find a picture of a mantel that you love, admire, and what will fit into your home, and your budget. You are going to use this image as your pattern.

I have already done the first step when I found Melissa’s mantel in the above image.

STEP TWO:
Label each design element on the mantel you have chosen.
Shall we dis-mantle the mantle piece by piece, and see what we can come up with?

fall-fireplace framed

STEP THREE:

Once you have identified all of the pieces it is time to make a list of what is needed.

Decorative objects (three golden apples)

Two picture frames with artwork in two different sizes.

Large vase for Fall branch with leaves.

A grouping of decorative vases.


STEP FOUR:

Study what each piece adds to the grouping.

For instance………
Three golden apples add balance, and a bit of shine to the grouping.

Two picture frames add a layered look, and height to the composition.

The Large vase with the Fall branch add height, theme(Fall), color and life.

The group of two vases add something solid next to something clear, and they also add texture.

AT THIS POINT IT IS
IMPORTANT TO NOTICE!

DECORATING TIP:
If you took a pencil, and drew a line from the top of each object to the next piece you would create an up, and down line, creating an undulating line. 

It is important to have your objects go up and down in height when creating a vignette on a shelf or mantel.

This line will create movement to the observer’s eye viewing the composition, and that is a very good thing.

undulating line 2


STEP FIVE:

Now that you have your list of objects shop your own home first, and use whatever will work in your composition. 

Remember we are trying to work on a budget. If you are missing some pieces make a list and then the fun part….. 

SHOPPING!!
Since this post is to show you how you can do this on your own, and on a decent budget we will start from scratch for the purpose of this lesson.

Where to begin?

I am going to start with the large vase that will hold my Fall branch because I have decided I want to do a color instead of a clear vase. 

Since color can be a jumping off point it is wise to choose your larger more colorful pieces first.

This is where you get to use your own individual style and taste.

$24.48
14261693

I chose this blue/gray demijohn 21in. vase from Target. 

The reason I chose blue/gray is because it works in my home, and I love to use darker values of blues in the Fall/Winter months.

Now that I have my color jumping off point I start to think of the next object that will most likely have more color to add to the composition, and the next choice will be the artwork.


STEP SIX:

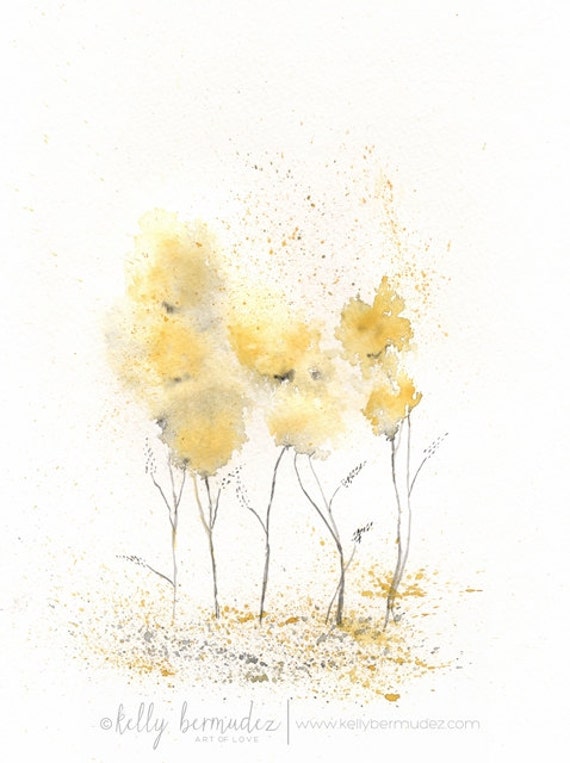
With blue as my base I make a trip to ETSY!

Etsy is such a wonderful resource of talented artisans and you can often find pieces at a reasonable price.

I typed in Fall watercolors in the search box, and here are a four of the beautiful images that I was attracted to.

I have them paired in two’s since we need two for our composition…………….


Pair #1
$20
Watercolor art My Tree  climbing tree love tree by CheyAnneSexton, $20.00


$20
Acorn Love /  Acorns / Fall / Autumn / Brown / by kellybermudez, $20.00


Pair #2
$20
Fields of Love / watercolor print / grey and yellow / gray and yellow / Archival Print

paired with………
$18
Fall leaves Fine Art Print of original by VerbruggeWatercolor, $18.00

At this point most people would think it was time to choose the picture frame. 

We are not going to do that next because we need to first choose our two decorative vases. 

The  decorative vases color, and texture will determine what direction we will go with the picture frames and matting.


STEP SEVEN:

Took a trip on line to Target! Target has great decorative pieces at a budget friendly price point. Plus, it is available to all on line.

Remember I am trying to make this budget friendly and accessible for all of my readers.

The first pair I chose resembles  what Melissa chose in her composition.
PAIR #1

                    $25                                $20
e605ea0182a2265f329402185db30d9c       1f51a4225b43795620c6027ebe2862f4
                   VIA                                         VIA


PAIR #2

                   $45.99                          $47.99
TARGET MEDIUM COLUMBO        TARGET MINI COLUMBO VASE

You will notice that the pair of vases vary in heights. This is important because as I previously said we want an undulating line to keep the eye moving from one object to the other in an up and down motion.


STEP EIGHT:

At this point I pull together the elements in a collage to see which pairings are pleasing to my eye, and it will also give me a clue to what picture frame finish and color I should be using.

FIRST PAIRING
Ribbet collage Fall mantel blog post

In this pairing I have a nice color combination, and textural, and height differences. It is warm and looks very Fallish to me.


SECOND PAIRING
Ribbet collage Fall mantel blog post #2

Since I tend to like lighter and brighter look when choosing elements for my own home, this particular pairing is more pleasing to my design aesthetics so I am going to choose pairing #2.

STEP NINE:

I bet you think we are going to pick out the picture frame don’t you? 

At this time we are going to choose the small objects that are represented in Melissa’s mantel by the golden apples. 

The apples give a bit of shine to the composition. I am going to do my own interpretation, and get some shine and textural difference by using votive candle holders.

In the Fall/Winter months I love to light candles so I always try to incorporate candles in my vignettes so that is why I have made this particular choice.

However YOU might choose the golden apples, pears, or even some other small decorative element that you enjoy using in your home.

Keep in mind, the lower height is what made me go with votives vs. a higher pillar candle

     $10.48
VOTIVE CLEARANCE 10.48

STEP TEN:

NOW!!
We get to choose the picture frame!!

At this point I have all of my colors, textures, heights and elements.

I take a closer look at my artwork which has clearer and brighter colors, then I look at my votive holder which has just the right amount of black.

I think a black frame will be a nice contrast in this configuration. For those of you who tend to like a more subtle contrast a nice natural to medium tone wood frame would work equally as well.

Ribbet Edit Fall Mantel blog post artwork

For me, black is my choice, since black and white are used in the room with my fireplace.

You will need to choose two different sizes of frames to give height, and a layered effect. Take a look at Melissa’s composition and see the heights she used.

fall-fireplace framed

Both frames are a bit higher than the second largest element, (clear cylinder vase) in the composition. 

Keep that in mind when choosing your frames. You might have to layer matting in your frame to make the artwork fit with off the shelf frames. 

We are trying to keep this budget friendly so we don’t want to do a custom framing job which can tend to be very expensive.

Stores like Michaels, Hobby Lobby, and Target have a nice selection of frames, and matting that you can work with. Ikea is also another great resource for budget friendly frames.

Of course none of this is an exact science, and what I have shown you is my own personal design aesthetics.

IMPORTANT TO REMEMBER!

The important lesson to take away from this is to lay out an overall plan before taking the plunge, and make sure it is pleasing to your eye and your budget.

I hope this blog post has given you a new way to look at composing vignettes in your home, and that you now feel empowered to move forward.

"ENJOY THE PROCESS!"


Monday, August 31, 2015

Coordinating Lighting Fixtures and Making Plans


I have talked about lighting in previous post as being somewhat like jewelry in an outfit. 

When you think about it, it adds sparkle, texture and sets the mood for the room, somewhat like jewelry does for an outfit.

When choosing lighting you need to keep in mind the overall style and/or mood of the room.

A way to tie lighting together is by its style as well as it’s finishes. 

There are instances where one fixture such as a chandelier over a dining table that is off by itself can be an over-the-top fixture that is completely different than the overall setting. 

This method of juxtaposition has to be done very carefully, and not everyone has the ability to do it well, so move in with caution.

Sometimes, “Different,” is just different, and it does not marry well to other pieces in a room, so I always caution non-professionals when trying to make this move.

I have been playing with lighting for my new home over the last week, or so. I have come up with fixtures that I truly like and now I have to marry them to each other.

Personally I find it very helpful to do a collage of sorts, and then put them with some of the base pieces that will be in the room to see if there is a gentle flow.

I don’t want anything to be jarring on the eye, or  to not make sense. I use a saying, " It visually flows!" all the time.

Let me set up the scenario for you…

Our new home will be a traditional/coastal look, hopefully somewhat like a Nantucket home. 

Of course I live in an area surrounded by vineyards, and not the ocean, but the ocean is where my heart always wanders.

It is a small cottage home of 1590 sq. ft. this is our retirement home, and we have downsized a bit.

My furnishings will be the same as in my previous home…


11


12

You can see I have a base of black and white, and blue and white. My sofa is a traditional style blue and white ticking, and I add pillows to change things up seasonally. Green is a constant accent color in my home.


spring summer look collage


Ribbet collage Summer Fabrics


winter look_thumb[5]ribbit


Now that you have a feel for my home let’s move onto the lighting choices I have in mind.

We will start with my entry hall which is small, (5ft X 8ft.) by most standards, but I am thankful to have an entry hall to greet my guest.

No matter what size or shape of entry you have my philosophy about entrances into your home is this…

“You are about to enter the place we love, and call home, as you enter I hope you know your are welcomed here. We hope we have made you just a bit curious about how the rest of our home will look by our choices in colors, wall treatments, and the other elements we chose to greet you.  We love beautiful things, but nothing is too precious in our home that it will ever be more important than YOU.  We hope you feel at peace, and relaxed while you visit here.”


The plans for my entry will involve one of two looks.....

One  look will be all white paneled walls, floor to ceiling, we have 10ft. ceilings, very similar to the image below….

white molding and wall frame art.

Once I move into our home I will be able to see  if this look will be the right way to go.

The other option will use a bit of color, and texture and I will go up 6-7ft with the panels in white millwork, and then it will be topped off with a navy/cobalt grasscloth. 

This will be an introduction to the  base colors that I will be using in our home.


I love the texture and warmth this wallpaper provides, such a fan of wallpaper covering

As you go further down the entry hall you will enter into the kitchen and great room area.

I will have a huge island in the kitchen that is 9ft long and curved. There will be white cabinets with a quartz counter top that is white with subtle gray veining.

I could possibly use a fixture over the large island, but I usually do not like visual clutter, and there will be another fixture over the dinette table that you will see all at the same time. 

Another reason it is very important to coordinate lighting fixtures. 

Once we live there for awhile I will be better at judging whether or not I will use a fixture over the island.

In the Great room there will be the furniture very much like what you have already seen in the above images of my previous home.

Sorry it took so long to set it all up for you, but I know if you are like me you like to have a visual picture  of the overall room or base.
 

Now lets move onto some of the different combinations I have in mind…….


OPTION #1

collage lighting choices 
The pendant would be the entry light, the large linear fixture would be over the island, the chandelier from our previous home over the dinette, and the sconces would flank the fireplace over mantle.


Ribbet Edit lighting choices
Here is the lighting with some of the base pieces that will be in the room.


OPTION #2

Ribbet collage Lighting choices 3

This option does not have any fixture over the large island, only a chandelier over the dinette table which is round. The Hicks pendant would be in the entry hall and the sconces would be over the fireplace mantel.


Ribbet Edit Great room lighting #5


OPTION #3

Ribbet collage New house lighting choices
             ENTRY                               ISLAND                   DINETTE                        FIREPLACE             


Ribbet Edit Great room lighting


OPTION #4

Ribbet collage OPTION #5


Ribbet Edit NEW HOUSE LIGHITNG 5

CONTINUING THE PROCESS!

After viewing all of the options I think it can give you a better idea of what will possibly work.

There will always be one, or two combinations that you will prefer over the others, and once you  get to that point then be very critical of your choices. 

Look at scale, color, texture and pricing. Yes, the pricing has to be considered by most of us, we all have the ugly.......

“B,” word =Budget!

Through this whole process always stay true to who you are and what you want. 

There are  many, many options out there, and it is so easy to be swayed. 

This is why I spend time sourcing my desires first, and I really get in tune with what I love before moving forward with any purchases. 

Once I have my options chosen then I can move to the next step of choosing what I love the most. 

For clients I like to only give 3 options, it is so much less confusing, but for myself I can handle more, in fact I have to see all of my options lined up as I have done in the above images .

Once I have it narrowed down to two choices, then I spend some time in the environment living with the options in my mind for awhile before ever making a purchase. 

I realize this is somewhat systematic for most, but having worked with clients for over 30 years I have found this method to be pretty fail safe. 

If you love something, and buy with your heart that can work for some, but on base pieces for your home I tend to like a more strategic plan.

Now that you have read my plan of attack, and have seen some of my choices, is there one combination you prefer over another, or would you mix them up in another configuration.

Let me know in the comments. I hope this blog post will help you out in any of your future purchases for your very own home.

FYI:
Above fixtures were found from the following sites....
BELLACOR
LAMPS PLUS
CIRCA LIGHTING
LIGHTING NEW YORK
HUDSON VALLEY